While a helmet, water, a multi-tool and a functional bike are needed for a mountain bike ride as a minimum, there are times when you need a bit of an energy boost. Whether it’s a race, a long day in the saddle, or if you’re like myself and a diabetic that needs a quick sugar hit to prevent hypoing on the trail, energy gels are a great resource to have. And one of my favourite brands is Torq.
Before I dive into this, energy gels do not replace a balanced meal and proper dietary set up. Having things like porridge in the morning before a race can put you in a better place than someone who glugs a quick gel on the start line and thinks that will solve everything. Energy gels should be used for intense exercise and for sugar recovery, nothing more. With that disclosure out of the way, back to the review.
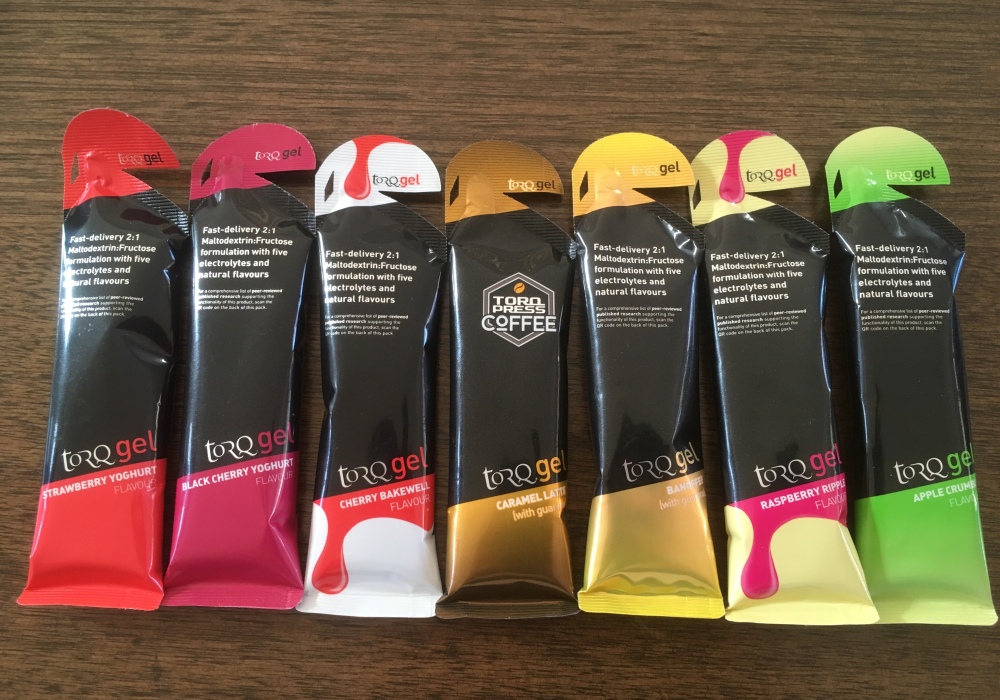
This is a non-sponsored review again, and most of these gels can be bought from Chain Reaction Cycles.com or from local bike shops that sell Torq products. To be fair, I have had Gu, SIS, Cliff and a few other brand energy gels in the past, and some of them are better than others. I had a smoked Canadian bacon gel once and my taste buds have never forgiven me since. SIS does a pretty good orange flavoured gel, but I only like it because it has a bland flavour that is easy to swallow when you’re on the verge of throwing up after a hard climb. But I go to Torq because the packaging design is pretty neat (rip the top to open but has a second bit of plastic to prevent the top from blowing away), the nutritional content is close to the same, and the flavours are strong, but not over powering. With that in mind, I selected a few Torq gels to try.
Left to right goes Strawberry Yogurt, Black Cherry Yogurt, Cherry Bakewell, Caramel Latte with Guarana, Banoffee with Guarana, Raspberry Ripple, and Apple Crumble. Some of these I have had in the past, while others are new. Two have Guarana in them for stimulation, the others do not. And I have elected not to have certain flavours like Lemon Drop because I’m not a fan of lemon flavoured stuff in reality, so these 7 have a fighting chance.
Strawberry Yogurt is the easiest to get along with. It honestly tastes like your off the shelf, non-sweetened strawberry yogurt. This is a great choice provided you don’t hate the taste of strawberry yogurt and you don’t want a gel that’s overly sweet.
Cherry Bakewell is definitely for the sweet tooths. It tastes remarkably like the cherry Starburst chews and had a really sickly sweet taste. Talking to my Trek dealer, he said it does taste like the Cherry Bakewell treats they have in the UK. My recommendation would be to have this after a race or during a long slow ride since the overall sweetness can be overwhelming.
Black Cherry Yogurt is the awkward hybrid of Strawberry Yogurt and Cherry Bakewell. It has a fairly smooth yogurt base flavour, but there is the sickly sweet taste of artificial cherry poking around your mouth. It’s not bad, but I prefer Strawberry Yogurt and Cherry Bakewell for their own individual merits rather than this mediocre hybrid…
Raspberry Ripple is good. Tasting like thin custard with a spike of raspberry in it, this is another flavour that is easy to get along with provided you don’t dislike custard or raspberry.
Apple Crumble follows the same suit as Raspberry Ripple, tasting like a creamier custard with baked apple in it. The taste lingers a bit longer than the others, and it somehow felt “heavy in my stomach”. Not to say that it will fill you and prevent starvation, but Apple Crumble might not be the best for those sensitive to lactose or bloat at the thought of cream.
Caramel Latte has had a few hit or miss reviews in the Bendigo riding scene. Some swear by it and say it tastes delicious, others have spat it back out and decreed it the worst flavour of the range. My opinion is that it’s great, provided you’re okay with sucking on caramel icing from a mud cake. It is just shy of Cherry Bakewell in terms of sweetness. With the addition of Guarana, it does help with mental fatigue and pepping you up mid-race, however if you are not a fan of coffee or the idea of eating cake frosting out of the piping bag, then look for something else…
Banoffee is the other Guarana infused gel in the group and is a bit more approachable than Caramel Latte. If a banana Paddle Pop and a caramel Paddle Pop had a child and it was liquefied in a blender, this would be it. It is as relatively sweet as Raspberry Ripple or Black Cherry Yogurt, but definitely has a banana taste to it. A pretty good gel nonetheless.
Rather than rank these and recommend which you should buy, it probably best to address why you might buy these and how I feel they fit within mountain biking. Energy gels are not the ultimate solution to energy during a race. Having these during a race will not take you from back of the pack cruiser to wolf pack leader, neither will they keep you in the lead by stoking you full of sugar and fruity flavours. What these are used for is a small sugar spike during a race to help get you past a bonk (or a zonk or “hitting the wall”, whatever you call it) and in combination with another wholesome food will get you back into the race. And this has to do with glycemic index and how carbohydrates/sugars are released.
Not all carbohydrates are created equal. You have sucrose, lactose, maltose, fructose, glucose, and starch. The first five are simple carbohydrates meaning they contain one or very few glucose molecules which are carbon, hydrogen and oxygen complexes. If you’re having traumatic flash back to high school science, sorry but keep up? Our body relies on carbon, hydrogen and oxygen in this arrangement for our cells to operate and do things. Our brains need carbohydrates to think, our muscles need carbohydrates to flex and move, and our heart needs carbohydrates to beat and keep blood pumping. Concentrating, lifting heavy weights, and getting your heart rate up all require more carbohydrates. And this is where glycemic index (GI) kicks in.
GI is how quickly or slowing carbohydrates are used by the body. Think about carbohydrates like petrol, paper, and wood to burn. Well we do burn carbohydrates so the metaphor will work. If I set fire to a kilogram of petrol, then it will burn very quickly or explode to say the least. But shortly after we have no more fuel to burn and it’s cold again. If I set fire to a kilogram of paper it takes a bit longer to catch on than petrol, but it burns longer than petrol and it provides warmth for a bit longer. But alas it will burn out in a whimper and we no longer get heat. Finally getting a kilogram of wood to burn can be a long process, but it will slowly burn and over a fair few minutes to maybe hours it will have a peak of warmth and then very slowly reduce to cold ashes. Petrol has a high GI , paper has a medium GI, and wood has a low GI in our example.
But if we want a fire that will start quickly and continue to burn well for many hours, we need to ignite it quickly but use fuel suitable to sustain it. Petrol soaked paper, why not? But we need to put it underneath the wood so it all ignites at the same time but as the paper burns out, the wood is now alight and it keeps going. If you are a decent camper, you will know it is easier to keep a fire going with a few logs every so often, than it is to continually tip petrol onto a fire since we can control the burn a lot more easily with wood, wood provides constant and usable heat, and wood is more easily dispensed onto the ignited fire. If we return to our race nutrition, energy gels and their role now makes more sense.
For a race, we should already have some form of low GI food in our system before we start the race or ride. Oats, bran cereal, or wholegrain toast will work well. Just before we start the ride, we need a boost of energy to get the gears turning and this is where you might want to have an energy gel? That or have a medium GI food like a banana. When you are riding along, it is better to have low GI foods at regular intervals to sustain energy levels for the race. But because we want to keep our hands on the grips and race hard, the average strategy will be to hammer out to a checkpoint and have a high GI source like a gel or fruit juice and hopefully a low GI like an oat bar. There is nothing inherently wrong with this strategy, but if you miss time your refueling window and bonk well before the checkpoint which has the food then you are left feeling dead and near last.
Gels have the potential to help salvage a bonk out on track since they are compact and provide a quick sugar hit to start you up again, but if you constantly need to rip open gels and slurp them then you’re wasting time, money and valuable bag space/weight. The wise racer would have had a low GI meal before the race and would keep up with lower GI foods, and only use a gel in case of an emergency. On a longer day of riding and exploring, you can take the time to stop and have an oat bar or sandwich. The only reason why I have energy gels in my pack is to treat hypoglycemic events for my diabetes. Otherwise there is usually a banana or an oat bar consumed during my rides to keep me going.
I find Torq to be a brilliant energy gel brand if you want something sweet, smart packaging, and a wide range of flavours. The consistency of the gels isn’t so thick you pop an eyeball out sucking on the sachets, but they aren’t so watery they “spill”. So if you absolutely need energy gels for riding or any other endurance sport, I would recommend these highly in whatever flavour seems great to you, but it might also be an idea to look into your pre-race diet and what you consume during the event? Hope this article gelled well with you?
One of the things I haven’t discussed about mountain biking and some of the products to look at revolve around video editing. In the world of mountain biking on YouTube, you have the broad spectrum of shaky, low quality first person footage of someone crawling down a local trail up to IFHT or Danny MacAskill making high quality masterpieces using professional Red cameras and lighting rigs. The thing is you can do better than low quality jank cam, and you can still impress your friends without needing the thousands of dollars in equipment that professional videographers possess. And filming and editing Sabotage is the best demonstration of how the average person can set about making a mountain biking film without breaking the bank.
Base Equipment
The ingredients to a mountain biking edit are like 4 ingredient pie: a mountain bike, a camera, a rider, and a computer. There is no need to get complicated with gimbals and drones, if you have the four basic components you can experiment with filming and editing. Once you find what part might be lacking or what you want to expand upon, then you can buy more equipment.
The mountain bike is the least of your troubles since in theory, you are a mountain biker. But it pays to have a suitable mountain bike for the type of trails you ride and have the suspension set up well. If you have your suspension set up poorly such as too firm on downhills or too wallowy on cross country trails, then it detracts from the riding and might make the footage unbearable to watch. It’s one thing to have a shaky cam because you’re hitting a rock garden at 40km/hr, it’s another thing to have a shaky cam when pedalling along a smooth section of flow trail. So make sure your mountain bike is properly set up so you can do your best riding and so the footage is stabilised.
Having a rider does not necessarily mean yourself. You don’t have to be the star in your own show, sometimes you might want to film your friends riding? By filming your friends, you can film things in 3rd person (off the bike) and track the shot, or you can do “2nd person” where you chase them on your bike using a camera. By filming your friends, they may possess skills that you don’t have or flourish in front of the lens where you usually have a derp face and yelp unnecessarily. But if you decide to film yourself, just remember to be yourself. There is no need to yell “radical” and “gnar brah” if you enjoy cruising along a scenic descent and let the footage do the talking. Not everyone has to be Seth’s Bike Hacks or Loam Ranger, be your own creator and enjoy the content you create.
Nearly everyone has a computer in this modern age. Whether a laptop, desktop or a smart phone with decent specs, these can be used to edit a video. Desktops can often be the most powerful, but will often be expensive and definitely not portable. Laptops are a great in between with software allowing great editing potential and a hard drive to store plenty of footage, but a laptop is heavier than a mobile phone and unless you have a gaming laptop will be miles behind a desktop. Mobile phones that connect to a camera like Go Pros can have a video editing app on them to make short clips to post to social media. This gives you the advantage of getting a short edit out quickly, and there is no need for more equipment that you might not need. But, you are limited by the phone’s capabilities, often need to keep the apps up to date, and there may be very few things you can do in the editing app. I previously used my laptop and Windows Movie Maker (oh the horror) but now I have a dedicated desktop for work and editing which has extra RAM and a hexa-core Intel processor. Davinci Resolve is a great software package that you can get for free, but when I had the trial version of Adobe Elements Pro CC boy did I love editing.
The final part of an edit and what people often need to buy is the action camera. Everyone and their aunt’s dog knows what a Go-Pro is, but there are other action cameras such as Kaiser Baas, Sony, DJi, and XCD just to name a few. Each have their own merits such as resolution, frame rate, software stabilisation, shooting modes, and price. And most action cameras will mount using the “almost standardised” Go Pro mounting system meaning chest mounts, helmet mounts, tripods, and roll bar mounts can be used from either Go-Pro or more budget brands. Regardless, buy the camera that is within your budget and how you interpret the reviews. Just because it isn’t Go-Pro, doesn’t mean it’s terrible.
My Equipment for Sabotage (and Future Projects)
Probably the best piece of equipment I own are my bikes. As I mentioned, it’s best to use bikes that have the suspension tuned properly and are suited to the type of riding you do. My “hero bike” is my 2016 Giant Stance 27.5 2 since it has 120mm of suspension travel to soak up hits, the brakes are the most quiet and powerful, being dual suspension it is capable of doing rougher trails more competently than the other two, and the fenders on the fork and rear reduce mud splatter to the lens. Kaiju and Warpath are unique bikes and often grab people’s attention when they are apart of edits. Fatbikes and single speeds are not exactly mountain bikes associated with edits. So I’m either using these bikes in low grip and/or flat locations (Epsom, Maiden Gully, Coomealla, Five Mile Creek) or I’m riding with my friends as a form of comical relief. We all know the best episodes of Top Gear are when they drive scrappy cars and mountain biking with my group is no exception!
In the video above, it also demonstrates how well the Go-Pro Hero 7 Black works without a mechanical gimbal. While I did contemplate getting a mechanical gimbal for the Kaiser Baas x150, in the end it would have cost $300+ to stabilise footage from a camera barely shooting at standard definition 60 FPS. So I bought the Hero 7 on special and I’m really happy with it. It works with all my Kaiser Baas accessories including my chest mount (used in the video above), my roll bar mount, a flexible tripod my partner got me, and the stick on mount on my helmet. I still have the Kaiser Baas x150 as a B-Cam for future group rides, but during Sabotage I shot everything using the Go-Pro Hero 7 Black as a proof of concept that you don’t need fifty cameras and a lighting rig to make something half decent.
My computer is an Acer Nitro N50 with additional RAM. Pretty much with a Hexa-core i5 8400 @ 2.8GHz, 40GB of RAM (2x16GB with 8GB boost), Nvidia GeForce GTX 1060, and my external hard drive storing the raw riding footage. Compared to my old laptop running an outdated i3 2.8GHz single core, 12GB of RAM, a Nvidia M760, and a crippled Windows 8.2 operating system, the new computer is so much better for video editing and writing articles for the blog. I did initially use Adobe Premiere Elements Pro CC for a trial period and loved it, but for $40 AUS per month for something that I don’t use for a full time job I went with a better option. Davinci Resolve in its free form is great, and you can choose to set it up “like Adobe Elements Pro” during installation so the user interface is almost the same. I appreciate this as a PC user. While Mac Books and Mac computers running iMovie are awesome, I am pretty much incapable of using Apple operating systems so I am happy with what I have and like what others do with Apple products.
And I am usually the rider in every video. I am not a downhill shredder, and I haven’t been to ultra-scenic locations like Whistler or Barcelona in Spain. So my filming and editing style revolves around music and quick change camera work, or first person footage and social commentary among my friends. As the rider and most likely the one that will edit it, it’s your job to choose the spots you shoot at, how much first person footage you take versus third person footage, and how you want the video to end up (I’ll cover this in Story and Style).
Story and Style
When making an edit, it is important to either have a story or at least a cohesive progression to the footage. No use jumping between random shots unless it is a fail compilation, so if you film at a trail it is best to keep your clips in order so you know what comes first and the one after. It doesn’t matter how hard you shred or if you’re not the fastest person on the mountain, the first step before you set off is to film yourself in chronological order.
On a sliding scale, you have your epic cross country riders that rely heavily on scenery for spectacle and the opposite end is downhill riders doing massive jumps and insane speeds for the wow factor. It’s not to say that downhill riders can’t have scenery or cross country riders can’t do insane tricks, but when you view the ecosystem that is mountain biking on YouTube and Instagram, you’ll notice this spectrum more or less. As a trail rider, I lean on epic scenery to make a great backdrop to my average riding but I also mix up my perspectives for something different.
As for story versus style, that’s up to you. Danny MacAskill and his team are masters of creating a story around stunts, while Seth’s Bike Hacks and The Singletrack Sampler tell a story through footage. Pure style might be seen as Sam Pilgrim or the first person race runs of world cup downhills, but these rely on footage being shot in chronological order so the audience can follow along. I have dipped into more story based videos recently, but my filming and editing technique might be seen as “style” since I drop clips in chronological order and overlay music. This will be a choice you can decide as you film and edit your videos since some people derive inspiration and creativity by having a cohesive narrative, others might prefer outright raw style and post-production editing techniques to make their videos great.
Shots! Shots! Shots! Shots Shots Shots!!!
It is obvious that you will need video to make your edit. Captain Obvious states the obvious… But how you approach this will ultimately determine your style/story and what you can do in post-production.
The most common footage is first person chest camera. It’s the most common since it is the most immersive, putting the audience behind the handlebars and your hands as if they were riding, and the weight to your chest is negligible compared to a helmet mount. The chest does not provide the best natural stability and going OTB puts the camera at significant risk, but if you angle the camera just right you can get awesome shots and resort to this view for most of an edit. Your next best mounting option is on the helmet, either side mounting like Jordan Boostmaster or on the very top like every rookie on YouTube with 3 views. Your head does provide the best stabilisation naturally and can be used to provide a “flying shot” of the trail, but it is exposes your camera to branches and trees and if you get the angle wrong it points down at the ground or into the sky. I avoided using this view for Sabotage for the disadvantages listed, along with how much a Go Pro strains your neck during chattery sections. So if you’re after a premium FPV shot for your edits, I strongly recommend chest mounting with a decent $40-60 strap.
Your “second person” views are the previously mentioned helmet mount on top since it’s almost like following your friend with a drone. But like a drone, if you crash it your camera may be toast. Another option, especially if you have a dialled dual suspension and can ride smoothly, is the seat post facing backwards. Using a post mount, secure the clamp to just below your seat post collar and have the camera pointing slightly up. I found having the camera the right way up not only squashed it under your seat when using your dropper, but it also started to tilt down after successive heavy impacts. If you have a fully rigid seat post like Kaiju, then securing the camera upside down just under the seat is an excellent choice since you now have less wheel in the shot and more trail. The only problem with this shot is having a friend that can ride hard on camera. Or having a friend at all to film… And you encounter the obvious problem of the back wheel flicking mud onto the lens and obscuring the shot. That was the part I hated the most filming at You Yangs a few years ago. For “second person shots”, I recommend a backwards pointing seat post mount, or maybe securing it to your rider’s pack somehow, but a helmet follow cam is also pretty awesome when pulled off correctly.
Third person shots are the best way to spice up an edit. If you just have a Gorilla pod, you can have wide landscape shots, coming to or going away shots, the camera can be overhead in a tree or on the ground to hear the buzz of the tyre. Point it toward the sky in the middle of a double to film yourself soar over a gap, or on the edge of a berm to witness your roosting skills. Hide the camera in a hollow of a tree to give the impression of someone spying on you riding, or place the camera so there is scenery in front to give the shot another dynamic. A Gorilla pod is probably the best addition to your gear load out since it can cling to trees and rocks, or stabilise otherwise rough ground. It can also be used to hook onto branches for overhead shots and since it is flexible, you can fold it and store it in your pack with little fuss. My only advice with third person shots is linking two or three shots with continuity. This is either shooting one shot where you move from left to right and follow up with a right to left or a coming towards the camera shot and then a moving away shot, and shots where you ride to a certain part of the trail and the next shot picks up at that next spot. It is disorientating when you’re hit with five coming to shots or a jump shot and when you’re mid launch it cuts to a nature shot of a mossy rock. Continuity is key whether in story driven edits or action clips. Having a “flowing video” means the audience are less frantically trying to piece together what is happening and concentrating on the weird editing choices, and can focus more on the awesome jumps and have fun with the video. One of the most stylish and visually appealing mountain biking videos is Brendan Semenuck’s One Shot video:
This is filmed in a continuous run and the camera tracks along at a predictable fashion. Maintaining “motion” is important, where the camera is still and the rider is moving, the rider is moving but the camera is keeping up (therefore relative motion makes the rider “still”) or the rider is stationary but the camera is moving (drone shots for instance). For a mountain biking edit, having people standing around and doing nothing often sucks. Sure there might be some funny banter, but people will want to come back and see an awesome edit of a trail, not mediocre stand-up by a wall ride.
Finally, you can have moving third person shots such as a friend tracking and filming from a stationary point, having drone footage, or zip line shots. These shots aren’t critical, but when used correctly and with great technique, can elevate a fairly amateur edit into something fairly professional. There’s a subtle art to panning a camera by hand to follow a rider, and flying a drone is tricky at the best of times, so unless you’re starting a YouTube channel to take on Seth’s Bike Hacks and GMBN, it’s best not to invest too heavily in drones and ziplines to make an awesome edit.
Cue the Music?
Choosing to have music or not is a contentious point in mountain bike edits. There are some purists that believe a mountain bike edit should be the sound of the trail and the laboured breathing after a hard climb, others use commentary to provide context and story to their rides much like Loam Ranger and The Singletrack Sampler. Seth’s Bike Hacks has addressed the use of music within mountain bike edits, and it’s fair to say “music shouldn’t be the dominant sound, it should sit in the background”. He has over a million subscribers and I don’t, so maybe take his advice…
But if you were to use music, how do you easily and effectively do it?
Here are two videos that use music as the main source of sound. My edit from Mount Mystic while reviewing the 2019 Giant Reign 2, and Pat Smage on a fat bike doing tricks at a skills park. My edit relies on first person chest cam and third person nature shots while Pat uses second and third person shots to capture his shredding. My edit falls under the “clip” style since aside from the progression from climb to descent, climb and final flow run; there isn’t much story telling happening. Pat’s video falls more under story telling since the song “Eye of the Storm” matches up with the grey winter sky of England, and the fat bike seems like an unstoppable hurricane when he unleashes it on the features.
But deconstructing both, there are key editing techniques of action pace matching music pace, and footage syncing with musical technique. Eye of the Storm starts out as being fast and punchy for most of the song, and this is where Pat does most of his tyre bouncing tricks and sick drifts. But near the end it settles down into the echoing section of “let’s get a little dangerous” where it starts soft and crescendos into the final chorus, again Pat is seen attempting the step up jump and fails a few times only to succeed and successfully ride off. Pat synchronises not only the pacing and tone of the song with the aggression of his riding technique, but certain tricks and riding progression are also matched to the progression of the song. This creates context and story without explicitly saying so. In my edit, I use the intro as a literal build up as I climb up the mountain, the riff and first verse serve to compliment the descent down Corkscrew, the short interlude is juxtaposed by the wide third person shot of Up DJ, and the chorus being the main component of the song kicks in when I descend ‘Shred Kelly’s Last Stand’ which was the main part of my typed review. Both videos exhibit how with some liberties and smart editing, what is happening on screen can be complimented by certain parts of the song such as solos, versus, intros, and even certain musical techniques. This will be important when I move forward into Sabotage since the song has a few odd elements that I can play with in the song to play off certain riding footage.
When changing shots, try to do it on a strong beat. Drums, bass guitar and electronic bass are what you should be listening for and basing your changes on. Watch my edit again and you’ll notice how I change shots on either a kick drum beat or inversely a resting beat. Changing off beat can be disorientating at times, and usually when you change on a particular beat system (say a cymbal crash) then it also gives the video its own tempo and pace. Along these lines, it is aesthetically pleasing when certain tricks and moments sync up with the music. Pat lands a back flip at 0:09 when the base drops, the synth pops and thumps along with his manuals and endos at 0:17, and the falsetto is accompanied by a slow-mo whip over a log at 2:01. This is brilliant stuff and you barely realise it at first but it’s what makes watching Pat’s edit so much fun!
If you choose to use music, do so wisely. Not only are you making a risky investment in having music over any mountain biking video, but not everyone has your taste in music. I have been guilty of this from time to time with my edits where I use a song which I think is awesome from my music collection, but when people watch my edits they say “awesome video, but what’s with the song?” This is often why Seth’s Bike Hacks or GMBN will use generic jazz or electronic music over their videos since it doesn’t outright offend anyone and it let’s the video speak louder than whatever ghetto grime lyrics they could have used. Music and mountain biking have their own questionable choices, so before you decide to make the edit to a certain song, try to imagine whether other people might enjoy the song and by extension the video? I’ve had to scrap entire projects because I got too in deep with using a new song, and realising the video is being awkwardly strung around the song. Music choice is entirely up to you, but don’t be surprised if people criticise otherwise awesome footage for having sucky backing music, or the video being removed from YouTube and Facebook for copyright infringement.
Lights, Camera, Action!
Filming starts with logistical planning days and maybe weeks before. Having an idea of where you are riding is key. You will need supplies for yourself, your bike and your camera for the ride. You need food and water, the bike might need a puncture repaired, and the camera will use battery and memory. Have your rider’s pack filled appropriately, your batteries charged, and memory cards empty. Knowing that you have everything in order to film will make the day go so much smoother.
If you are doing an epic edit with third person camera angles and first person footage, it is best to have cameras rolling from the get go and when you find something significant to film, hop off the bike and set up the third person angles from that. This appears to be Seth’s Bike Hacks style since he may only have a day or less to film in unknown locations and this filming schedule gives the impression that he’s discovering the trail as you are watching it. Brian from BKXC has the Go-Pro constantly running in first person chest camera so he can maximise riding time and edit back to the epic scenes only. Brian is an excellent example of how first person footage when pieced together in a chronological order makes a great story.
My editing style relies more heavily on the planning side of things, where I will often ride out on a scouting lap getting a feel for the trail, noting major obstacles or features for a great third person, and potentially finding B-lines so I don’t hurt myself on camera. The second lap will then involve sprinting certain sections while filming, slowing down with the camera off the transition to the next segment, and then start filming again by either first person footage or setting up a third person camera. This style is far more time consuming than filming as you go, but you have a greater ability to control what goes into the edit and plan certain shots.
Do you leave the camera rolling while not doing an “action take”? Eh, I don’t since I often ride by myself and like to focus more on mountain biking. But some people will often keep the camera rolling at all times in case someone stacks off camera or there are some genuinely funny moments like seems to be the case with Biking With Bobo. But all the time you are filming, you are using battery and storage so choose to do this at your own risk…
Is night riding possible to film? From my experience it is but only if you have a decent quality riding light and you’re wanting to convey the isolation and intensity of night riding. There are no third person corner shots or drone follow cams, just footage of trees manifesting out of nowhere and disappearing again. Any shot can be ruined if someone points a light directly at the lens and the white colour correction goes off the chart. Judge for yourself by watching the video below, but if you’re making an edit ensure you are filming during the day time with some cloud cover to allow for a lower ambient brightness and a smoother colour palette for the camera? High contrast shots are harsh on the eyes and will obscure fine detail, so a nice amount of cloud that takes the bite out of the sun is the best.
The take home points are film during the day (ideal conditions are light cloud cover to improve video quality), pack everything you and your camera needs the night before, and have some form of a plan of how you will film whether by filming as you go or scouting out the location first and then filming meticulously.
For the Love of the Video
The make or break of a video is actually wanting to do it. We have all seen our favourite YouTubers make a mountain biking video or otherwise, and the video just seems meh. Their enthusiasm is flat, the editing is janky, or it kind of seems like everything is so scripted that the video was created at knife point. And that’s the thing, if you’re not passionate about the video then it will translate to the final product. Out of all the videos I have done in my short stint as a mountain bike videographer (can I really consider myself that?), I have only resented maybe three videos or so. Flame Trees in Beechworth is the stand out one, the only thing that made me want to publish that video was the adorable echidna I met on the trail. The second was Hollybank Reserve in Tasmania since the trails available to me were too tame and the review bike I had was overly complex to properly have fun on. The most recent one was riding at Eagle on the Hill in Adelaide where the trail network was so frustrating that I didn’t have a good time and I didn’t feel inspired enough to drop in the first piece of footage and cut it into something. Eagle on the Hill was 18GB of footage wasted.
But while I wasn’t a great rider or videographer when I started, one of my favourite videos to film was Five Mile Creek with Patience by the Bad Suns. My first video was a bit of an amateur hodge podge of sorts, but it taught me a lot of things and got me into filming. Bright is awesome to ride and has probably provided me with some of the best footage to edit with. I have filmed three separate videos at Bright using Titan, Warpath, Kaiju, the 2018 Trek Fuel EX 9.7 (https://throughanamateurseyes.wordpress.com/2018/07/03/rider-files-32-need-for-speed-carbon/), and most recently the 2019 Giant Reign 2 (https://throughanamateurseyes.wordpress.com/2019/06/04/rider-files-48-a-new-reign-of-terror/). Most recently, I was ecstatic to film at Fox Creek in Adelaide thanks to the picturesque climb of Middle Earth and the hyperflow trails that spit you down the mountain. Seeing as Flame Trees was filmed after Patience, Hollybank was filmed in the middle of my Bright videos, and Eagle on the Hill and Fox Creek were back to back days, my feelings on everything it isn’t the camera gear or bike that makes a difference; but the attitude you take into filming and editing the video itself.
And that’s kind of why it has taken me so long to film and edit Sabotage. I could have made numerous edits of Bendigo before this, but I always knew my skill both on the bike and behind the camera would need to be improved. After my accident last year and wanting to have a more casual approach to riding, I felt that focusing on filming and making an edit that is enjoyable, not just fast, is what I needed to do and that was the approach needed for Sabotage. And while I hit the ground running early this year with filming Epsom, Maiden Gully, and Spring Gully before March; it did take a while to get the mojo going to film Strathdale and then One Tree Hill. But then everything was done with passion and that’s why I hope Sabotage is one of my better edits. It will take some time again to make the first draft edit of Sabotage, and it might take some time after that to hit the publish button on Facebook and YouTube. But when I do finally reveal Sabotage, I hope it is the best video I have made and encapsulates the last 3 years of mountain bike videography that I’ve done.
After Sabotage?
Oh yes there is a project after Sabotage. Two actually… The first will be the Bikes and Beers Trip 2.0 where I will revisit the networks I originally filmed in Bike and Beers but with the Go-Pro Black 7 and some different bikes. Forrest (Yaugher), Anglesea XC, You Yangs, Hunchback, Yackandandah, and Nail Can Hill are all locations locked in for filming and will form another series of videos. The other project will be another cummulative project like Sabotage, but taking on Castlemaine’s trails. While Woodbrook and Baco have already been seen, I would like to return and do a better edit alongside Piney’s, Harcourt, and Redesdale. I’m not sure if there will be a visual style like Sabotage, but there will be a cohesive element like the Hawaiian shirts and aviator sunglasses of Bendigo.
I hope this article has helped you with some filming and editing ideas for your mountain bike edit, or has at least entertained you with why and how I got into amateur videography. So until I finally decide to publish Sabotage, stay tuned!
Honestly, One Tree Hill has been a daunting proposition for this video ever since I set the goal of riding in the best spots in Bendigo. When I was out filming, it was honestly my first time riding out there and it was before a storm rolled in and I was on night shift. So time pressure, not-wanting-to-get-hurt pressure, and filming pressure were all on me for this one. I put on my upper body armour underneath my green Hawaiian shirt and went for it. To be clear, this is the same place that my bike shop said “my dual suspension may find it hard to traverse, pinch flats happen constantly, and descending is just as hard as climbing.” On the day of filming, one of my riding friends did 380m of climbing total across 30km at Spring Gully (Sabotage 4) and I did the same climbing in 12km. Just to indicate to you that One Tree Hill trails are a whole level above Spring Gully, Maiden Gully, and Strathdale…
The Network…
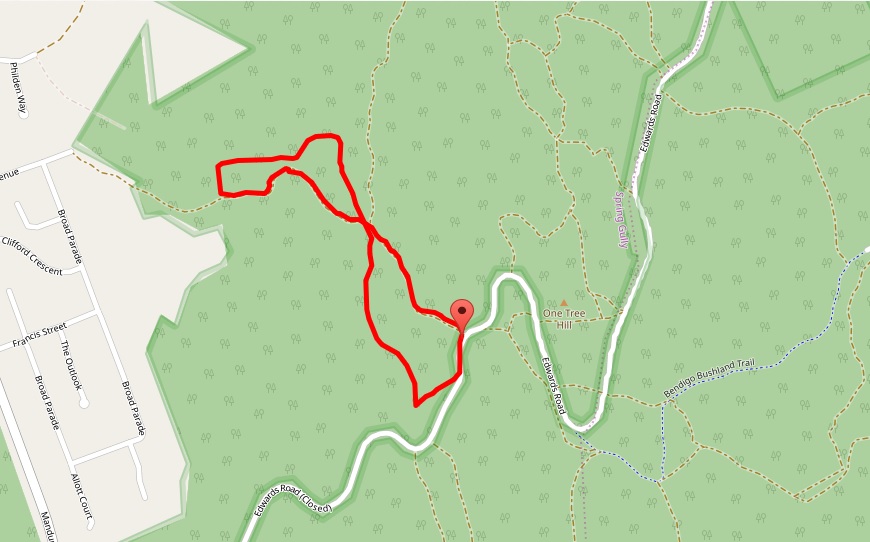
Oh dear… Well I offer you this 1.6km loop that I found off the One Tree Hill look out:
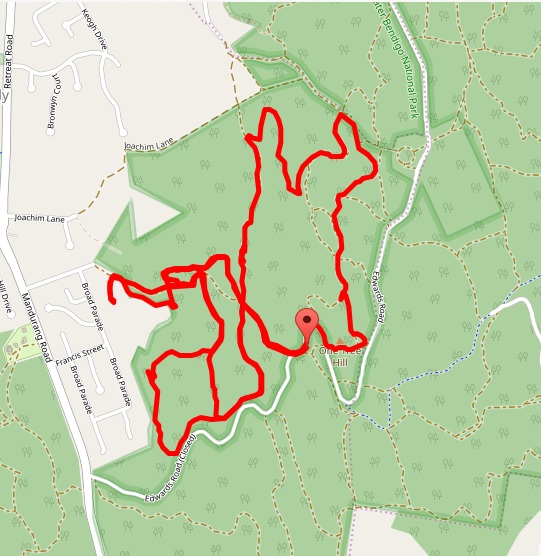
Sure it’s a little boy compared to the other networks I have posted, but this is a very basic loop. On the day my total ride consisted of this:
I rode some sections forwards and backwards, some sections I rode twice just to access another part of the system, I rode up what looked like a downhill trail, and there were many fire road trails in between. I’m not sure if there is strictly a loop that you can do at One Tree Hill, rather you go out onto the hill to challenge yourself with several segments?
One of the best starting points would be driving up to the lookout on Edwards Road. You will need to approach Edwards Road from Kennington side rather than from Manudrang Road, since from the start dot down to the junction at Mandurang Road is sealed off with road blocks. Your other option (which will be discussed in the Trail section) is to use One Tree Hill as an add on to Spring Gully or Strathdale.
Bike Choice
Downhill
1 star (3 if you have a shuttle driver)
Enduro
4 stars
Long Travel Trail
5 stars
Trail
4 stars
XC/Trail
4 stars
XC Race
3 stars
Cyclocross
0 stars
Fat Bike/Plus Blike
1 star
One Tree Hill has the odd distinction of being a pretty good place to ride a downhill bike, provided you have a shuttle driver to pick you up and drive half way round Bendigo to let you go again. What you really want is a capable enduro/trail bike to help you down the rocky descents and challenging steep climbs. While you could plan a route that would favour a XC race bike and avoid the large drops, if you are heading in completely blind like I was during filming you need a pretty technical bike for downhill and climbing. Fatbikes and plus bikes beware… With the gnarly rock gardens and odd split stumps in the middle of the trails, this is a haven for pinch flats. There is minimal room to dive off line, so at times you are forced into a probably pinch flat situation rather than risk falling down the granite and sandstone ledges.
The Trails
Welcome to flavour country! Unless you are riding the fire roads in between the actual singletrack, there is no such thing as a green trail. You are looking at a blue and upwards, so don’t expect the tame flowing trails that Spring Gully and Epsom can offer. There are no trail markings, some of the sections are overgrown or covered in slick moss, and some of the trails go from “meh” to “why is my life flashing before my eyes?” in a matter of steps. There is no clockwise or anti-clockwise loop, there are no designations of whether this is a climbing or descending track, you are now on the most challenging enduro trail network Bendigo has to offer.
From the sections I rode, most of the trails are based on “kangaroo tracks” that wind tightly between trees on loose on hard pack, moss covered rock, granite slabs, sandstone boulder country, eroded ruts, and fallen trees. There are no wooden features to speak of from the trails I rode, and the YouTube videos of Wil Barrett demonstrate One Tree Hill relies on large rock drops and rock gardens to create a challenge.
If there is a stand out section to me from the trails I explored, it would have to be the ridge line that starts near the cross over point and extends north. I have an odd affinity for ridge rides and canyon runs. Being in a narrow chasm or on top of a narrow ledge reinforces how singletrack is just a line you follow and once you remove the wide run off areas it dials up the intensity. Plus these types of singletrack can often have the greatest views or tranquil surrounds. However you feel about singletracks on ridges, One Tree Hill has a pretty good one.
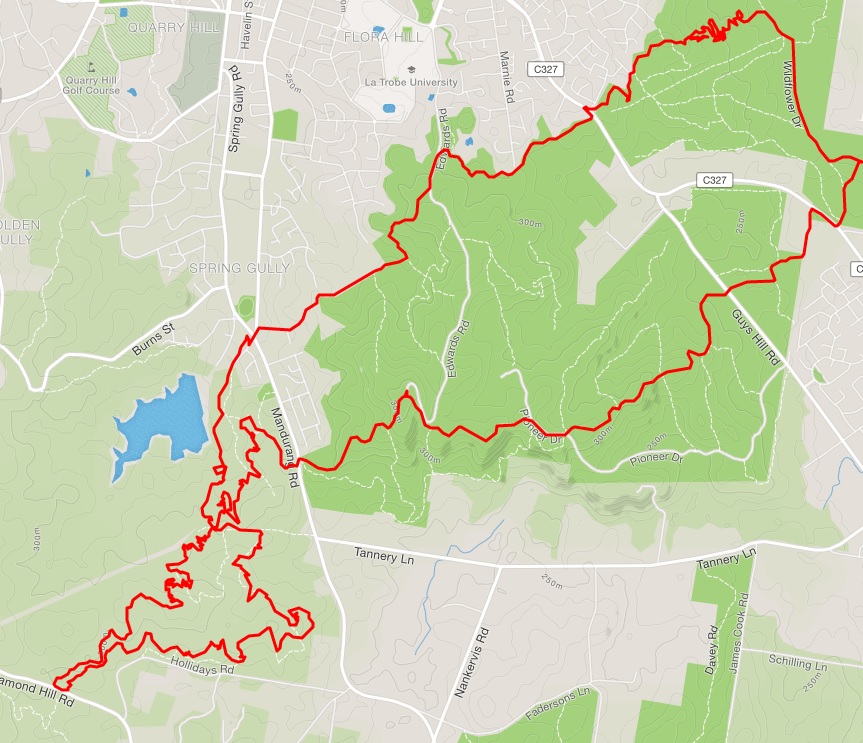
One Tree Hill has a unique distinction in Bendigo since you can ride it to get to Spring Gully/Muldoon Reserve AND Kennington/Strathdale. If you have the stamina, in theory you could enduro all three loops described in the Sabotage Files so far? This map from one of my Strava friends shows them traversing through One Tree Hill to get to the 15km Spring Gully loop. Again, if you know the trails well enough and can link them into a decent sequence, One Tree Hill can challenge you in many ways.
The way to tackle One Tree Hill is establish a base loop like I have, and then one by one explore different forks and see if it takes you back to some part of the base trail? With this “brilliant logic”, you will be challenged by steep technical pinch climbs that come out of nowhere or rock drops that you might not have enough speed for. It’s fun! Haha…
Final Tips
Mainly, bring a sense of adventure and the kit to back it up. Bring a riding friend or at least a modern mobile phone with satellite navigation in case you get lost or injured. You will need a spare inner tube in case of pinch flats, and a fairly decent array of tools off a multi-tool because you might bend a rotor, snap a chain, or mangle a derailleur hanger. Out of all the places to ride in Bendigo, please heed this warning?
There are no toilets, fresh water supplies or bins in the national park, so please do your business before you ride, have plenty of water and take out what you brought in. If all else fails, just ride until you find a road and try and follow it back to the look out.
This is a steep network is not routinely maintained, has no signage, and have trails that step into double black diamond territory. For these reasons, make sure you are well and truly set up to take on this place. This is not the skills loop at Muldoon Reserve, or the flat flowing tracks of Epsom. This is a labyrinth of challenges and pain. So again, please be careful above all else?
This about wraps up filming for Sabotage. I did want to ride out at Eagle on the Hill out in Kangaroo Flat, I have heard whispers of trails out at Eaglehawk, and there are private trail systems called “Andy’s Trail” and “John’s Trail”, but the purpose of Sabotage is to demonstrate the mountain biking in Bendigo that is easily accessible and how varied it is. In time I may do these as “Extra Sabotage” riding files, but with five filming locations and a tacky set of aviator sunglasses, it is time to start editing this video…
The most important part of your bike isn’t the suspension, the wheels or the frame, but rather you. Any bike can sit on a showroom floor valued at more than a brand new hatchback, but a bike is built to be ridden and that requires the valuable component of a human. But then what is the most important part for the rider then? Aside from fitness and a can-do-attitude to ride some trails, you need a quality mountain bike helmet. Runners can be used rather than 5 Ten clipless shoes, a daggy T-shirt is more than qualified to replace a Fox racing jersey, and while it does feel uncomfortable, cargo shorts can be worn rather than chamois shorts. But I digress from uncomfortable feelings of chafe, because a proper certified mountain bike helmet is what you truly need to get into mountain biking regardless of the price of the bike or how many gears it has.
This post is more or less the result of my helmet being cracked during the crash that also injured my shoulder. I have thought about helmets and their role in safety in the past, one of my first rider files was the types of injuries in the sport of mountain biking and how head trauma constitutes a large portion of severe crashes (https://throughanamateurseyes.wordpress.com/2016/02/06/rider-files-2-mountain-bike-warriors/). In my piece on introducing new people to the sport, my number one rule above all else was to ensure they had a quality mountain bike helmet that fit them before they even touch a dropper post remote (https://throughanamateurseyes.wordpress.com/2017/04/16/rider-files-16-recruiting-riders/). Helmets are pretty serious stuff and should be treated with as much respect as your drive-train or brakes. Without a helmet, the first time you come off a bike and smack your head into a rock, it would be a one way ticket to a mechanical ventilator and a front row seat in an intensive care unit. So how did we get to the point of full face downhill helmets, MIPS, and my partner having a bright pink trail helmet even though her top speed is 18km/hr?
What we know as helmets can be traced back to the “hairnets” used in road cycling. Consisting of leather strap/belt around the circumference of the head and then leather straps across the top of the head and a chin strap underneath, these had the goal of reducing abrasions and lacerations when hitting the ground rather than cushioning the head. These were the times where CT wasn’t invented yet and riders would notice superficial injuries such as cuts and open wounds rather than internal bleeding of the brain due to impact injuries.
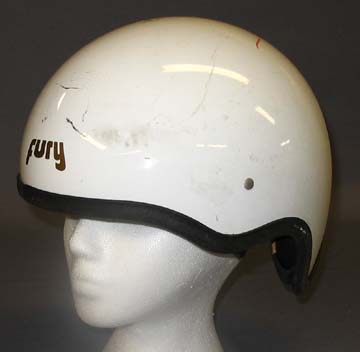
Around the 1970’s, companies that produced helmets for motor racing began to realise that cyclists were dying from severe head trauma. To address this, they began making and marketing motorcycle-like helmets to cyclists such as this Fury to sell their product but protect their customers.
While it was a step in the right direction, the problem was there were no specific safety standards like there are now. The early bike helmets were often heavy, and while there were hard and durable, they didn’t cushion the head on impact but rather had a hardened skin. Bicycle riding groups at the time started collating data and testing different ideas until they realised that bicycle helmets would need to become separate to motorcycle and car helmets. A soft polymer or foam lining would be needed on the inside, a way to anchor that to the rider’s head, and then an outer protective case to protect the lining from the elements. This laid the foundations for what we know as a bicycle helmet.
Government safety regulations dictate whether a helmet has the ability to protect a rider in the event of a direct head impact. Helmets are only designed to take a single major impact (therefore save the person’s life) and be destroyed, but if a helmet is deemed unable to absorb the appropriate amount of force and reduce the blunt trauma to a person’s head, then it won’t pass safety standards. And while cheap manufacturers can make “helmets” out of the same foam you get from take away coffee cups, slap a sticker on it and sell it to you cheaper than two onions, unless the government recognises the specific helmet passing their testing then it is useless. For example, I knew a boy in my home town who had bought a helmet from a department store because it had Spiderman on it and the mother saw it had “the Australian tick of approval” sticker on the inside. Being a kid, one day he was riding in the streets and slipped and hit his head on the asphalt. The helmet smashed into literally hundreds of pieces and he was in a children’s hospital for months recovering. During his recovery, the mother found out the helmet hadn’t met Australian standards. Lesson is, just because it has a tick on it doesn’t mean it gets full marks. Do your homework!
So provided a helmet can absorb a large enough impact to significantly reduce cranial trauma; what exactly are mountain bike helmets, how do the designs vary and why is MIPS such an important thing all of a sudden? Why don’t cross country riders have full face helmets? Why do downhill riders also wear neck collars? Why do proper mountain biking helmets cost so much? And is there any future developments in the field of mountain biking helmets?
Anatomy and Divergence of the Mountain Bike Helmet
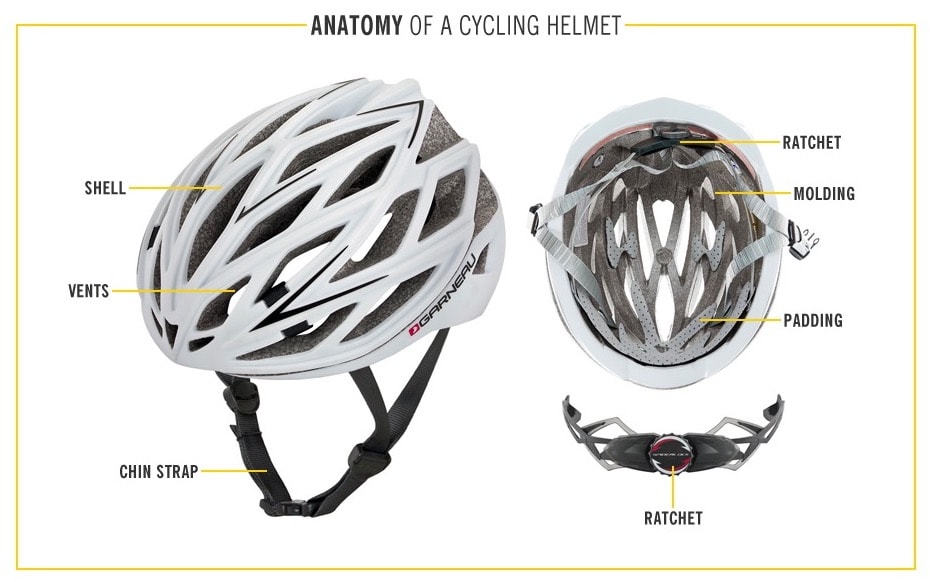
A mountain bike helmet has two main parts, the retainer and the shell. The shell is the styrofoam/polymer layer that protects your head in a crash by absorbing the impact and either deforming or breaking as a result. The retaining mechanism is made of the straps and loops that help to keep the shell on your head. MIPS more or less falls within the retaining system since it links between the shell and the retainer, but that is only if the helmet has this protection mechanism. Everything else including visors, ratchet system, pads and attachment points fit to the shell.
With the basic anatomy out of the way, comparing the above road bike helmet to the image below, what do you notice?
The most notable aspect about the shell is the lower rear portion of the helmet. Protecting the occiput (lower back part of the brain), this longer rear part of the helmet serves to protect the back of you head when falling backwards in the event you wheelie or flail out of control on a downhill crash. With road riders being in a more “controlled environment” where they either go over the handlebars or fall off sideways, road bike helmets favour ventilation and lightweight construction rather than greater protection and sturdy design. Considering that a road bike can get up past 60km/hr, a mountain bike helmet may strike rock, wood, metal or soil at a variety of speeds at odd angles. With a lower rear guard, there is also less ventilation compared to a road bike helmet since you don’t want branches or rocks spearing through the gaps and slicing the rider’s head open. Finally the visor is larger in order to shield the rider’s eyes from high sun. It isn’t overly aerodynamic, but with mountain bikers wanting to have “more fun” rather than break land speed records, a broad visor is good.
Divergent Evolution of the Mountain Bike Helmet
At some point mountain bike helmets would have had a common ancestor, maybe something like the smooth shell Fury helmet or something akin to a “basic” bicycle helmet you see in department stores. But why is it that cross country helmets resemble road bike helmets and downhill riders use full face helmets?
First and foremost, consider what I just stated. Cross country riders are often doing long distance races in which the rider needs to be comfortable for long periods but at the same time they need to be protected from impacts such as falling off frontwards, sideways and backwards. Enduro riders will often pedal uphill at a moderate pace, but want full protection for when they do their timed downhill runs. And downhill riders are going at insanely fast speeds downhill over incredibly rough terrain, with the ability to fall any direction and also be rotated in any direction in the air.
This means that cross country helmets are as light and ventilated as possible, but have a durable helmet shell to protect against high speed crashes. They need to be able to breathe easily, as such a chin guard is not required. When you watch a world cup cross country race, most of the time they fall sideways after washing out, or over the bars in a rock garden. While they do rarely go backwards in some miraculous crashes, they risk occiput protection in order to have a more lightweight and breathable helmet.
Enduro helmets are the evolution of trail helmets where they have the occiput protection at the rear, but then incorporate removable chin guards to allow their riders to smash the downhills. Without the chin guard on the climbs, enduro riders can breathe more efficiently on the climbs and drink water easily during the transition stages. But by attaching a small piece of equipment to the base of the helmet, the reinforced chin guard protects the rider’s mandible and facial bones during high speed crashes similar to a downhill rider.
Finally, the downhill helmet provides impact protection from almost every angle of the head and the chin guards is integrated into the base helmet. This allows for maximum structural integrity and a lighter weight design than an enduro helmet. Only having to sprint a section of downhill trail, they never slow for a drink and the excessive speeds allows for air to rush over their face and head to cool them. On top of this, they also have neck collars to protect from whiplash. While most people look to head injuries as the worst injury to a mountain biker, if someone’s neck bends or compresses with enough force in the wrong direction, a mountain biker could become para- or quadriplegic, or possibly severe their vertebral arteries and die. To prevent abnormal neck movements, a downhill helmet is supported by a neck brace to prevent these kinds of injuries. Downhill helmets are the most utilitarian of the mountain bike helmet family, but with the speeds these riders reach and how their body can end up in any rotational axis, it’s better to be safe than sorry.
MIPS and the Brain
So far I have talked about how helmets protect from direct impacts during a crash. Seems simple enough that if you smack your head against a surface dead straight, you injure your brain since it is surrounded by liquid (cerebrospinal fluid) and is floating in your skull cavity. Smashing your brain means it runs forward into the skull and collides into the skull and becomes bruised to a minor extent, or it compresses and destroys blood vessels causing a haemorrhage or “brain bleed” in a major incident. Since blood is not meant to be on the outside of the brain and intracranial bleeding causes an increase in cranial fluid pressure, soon the bleeding compresses the brain so much it destroys it and we die of brain death. But this is only if we consider direct impacts to the brain and how a regular old helmet might save you. Why is MIPS so important?
We have been considering impacts as a perpendicular force to the point of the skull. But in mountain biking, forces can strike us from different angles and the surfaces can be on different angles them self. If the back of my head hit a rock that was 45 degrees to the point of impact, then as my head hit, 50% of the force would be imparted straight up into my head, and the other 50% goes to the side which can cause rotation and translation forces within my head (in theory 50/50%). And when friction is accounted for and the fact your impact doesn’t stop the nanosecond your head hits a surface, hitting your head on any oblique surface means your head starts to rotate as you experience the impact and continues to do so. That means your brain starts to spin in any direction and that causes small impacts around the edge, the spin also means your neck can start to rotate and flex at odd angles, and finally your rotating head can be subjected to G-forces in any direction and magnitude which multiplies the damage. So after taking our simple model of head hits wall and adding in rotational forces, how can a MIPS helmet help?
First, you still have the outer shell which absorbs the initial impact. Styrofoam crumples on impact, and remaining forces are transmitted to the head still. But then the MIPS liner (multi-directional impact protection system) begins to rotate on itself to start cancelling out the oblique impact angles.
From the diagram, you can see that the outer shell begins to rotate while the inner MIPS liner and head remain straight. While this still seems to paint a grim picture for the rider crashing, it is better than if the outer shell gripped the ground during the crash and caused hyper-extension of the neck and the rotation of the brain within the cerebrospinal fluid. With the outer shell taking the majority of the force out of the impact and the MIPS then removing some of the rotational forces, brain and spinal related injuries are minimised. Which is great.
However, MIPS is a patented system and for that reason, companies producing helmets with the MIPS liner technology must pay royalties to the inventor. On top of this, the helmet company also needs to pay for the additional material costs that go into a MIPS liner. In the world of legalities, manufacturing and sales, it is either the consumer that must pay the excess in order to receive patented technology, or the company risks getting sued by cutting corners in legal processes in using patented technologies. In an ideal world, MIPS would be a patented but free to use product like the three point seat belt that was invented by Volvo and has now become the industry standard, but this is not the case in the world of bicycles and safety…
The Future of Helmets
There are two directions that bicycle helmets can take and one seems more practical while the other seems to be a bit unique. One is available right now and will become the evolution in MIPS, while the other may not pass safety requirements in certain countries. And so we have the WaveCell against the neck airbag.
The Bontrager WaveCell builds upon the design principles of the MIPS liner, where this liner can rotate under impact to protect the rider’s brain from rotational and directional forces. But the WaveCell has the ability to deform in all directions and in more complex ways than what the MIPS liner is currently capable of, allowing for a greater reduction in head and neck related injuries. It will be interesting to see if the WaveCell patent becomes free for market use, if Bontrager will sell the rites to other manufacturers to use in their helmets, or if it will remain a Bontrager design exclusively. But for now there is a revolution on top of the MIPS.
Then there is the neck airbag pillow from Sweden, which is set to revolutionise helmet design for those that don’t want to ride around with a helmet. Wait, what?
For some reason this device pops up in my Facebook news-feed thanks to Interesting Engineering and every cycling enthusiast page moderated by a Russian spam bot, and boy does it present some advantages and risks. From the left picture, you can see that the helmet deploys when it senses you going from riding position to “almost on the ground”, and on the right is demonstrates that it flawlessly integrates into your black dress, providing you are a sleek Swedish super model with a tall thin neck and can pull off black. Jibs aside, my first problem is the left picture. At what point does the neck airbag sense you are about to fall and thus deploy the airbag? If I sneezed hard enough and my head tilted forward at speed, does that mean it will deploy? And in the Facebook videos it shows it can inflate in a fraction of a second to ensure it’s there when you hit the deck, but what if you head is about to hit a tree like on the third freeze frame and thus it hasn’t inflated to protect you? And being a single use item is great for those of you that want it for a one time occasion but don’t want to ride with a helmet, but how do you ensure its integrity? You can take one look at a helmet and realise how damaged it is or if it’s integrity is compromised after being ridden for three years, but what if you crash one day and the airbag doesn’t deploy? And what if it gets caught in your clothes?
Moving to the right image, it demonstrates how sleek it looks as a “scarf” and how it deploys to become the Michellen Man’s downhill helmet. Great, but what if you have a short fat neck? What if your jumper covers the rear of the neck airbag and prevents it from fully deploying? When a regular airbag deploys it is often scorching hot thanks to the chemical reaction used to instantaneously inflate the bag and has a vent hole to ensure you don’t smash your face into an exercise ball. Does this helmet use the same inflation reaction and how cushion-y/rigid is the helmet part? And do you need to replace the entire assembly after a crash or does it come with refills?
Obviously this would never work for mountain biking, but even as a road biking or commuting helmet, I am definitely skeptical as to how this works and the effectiveness of the design. Great click-bait, poorly thought out idea…
Shell Out
Seeing as we only have one brain and it kind of helps to keep it intact, if you’re into the sport of mountain biking or any cycling discipline, it is vital that you buy a quality mountain bike helmet to save yourself. For the $150-300 you spend on a quality helmet, you are assured it will protect your head in a crash, and some stores will provide a free replacement in the event that you crash in reasonable circumstances within the first year. That is how dedicated some stores are to protecting your brain. While some people remain skeptical about MIPS and there are even a few that believe helmets cause greater brain injury than not wearing a helmet (but there are also flat earthers), if you invest in a quality helmet regardless of MIPS or WaveCell, it will out you in a better position to survive than buying a $20 department store helmet and ensuring your next ride ends in an intensive care unit stay. So ride in cargo shorts and sneakers, but please get a decent helmet to save your life?
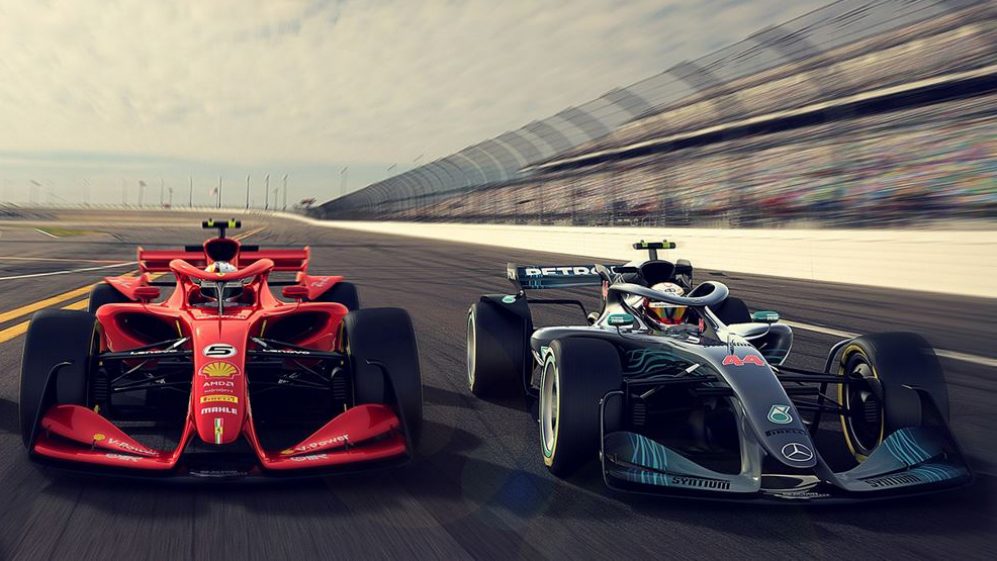
Back at it again, and now I am trying to address the issue of the performance gaps between the teams. Currently in the 2019 season, we have Mercedes in a league of their own and almost untouched (except for Max tapping Valtari in the pits at Monaco); Ferrari and Red Bull fighting for 3rd to 6th at the best of times; Torro Rosso, McLaren, and Haas providing some decent mid field battles; Renault, Racing Point, and Alfa Romeo Sauber being hit or miss in the mid field or retiring; and Williams get a participation ribbon every race. Seriously, Williams have always finished a race in 2019 only if behind by a lap or two…
But is there a way to reduce the performance gaps between the teams and make the racing “closer and more based on driver skill”? Can we alter the rules and regulations to a point where racing becomes competitive again and not about who has the largest budget to push the limits of the regulations? This could get messy…
The Rise and Fall of Constructor Empires
For the current grid, 6 out of the 10 have previously won constructor titles. Ferrari being one of the longest and most continual constructors have won the most titles out of all of them. Fair enough. But Williams and McLaren are now second and third respectively in total titles. The last time they were competitive was in the late 1990’s, but nevertheless this will be important later on. Mercedes and Red Bull sit at fifth and sixth respectively (Lotus is fourth for those wondering) and while Mercedes took a 20 year hiatus from the sport, Red Bull Racing have only been around since 2005. Not bad… Finally Renault have two constructor’s championships to their name and it’s better than nothing. That means that Haas, Alfa Romeo Sauber, Torro Rosso, and Racing Point (or Force India) are the only teams on the grid not to have a constructor’s title to their name.
And they often earned their constructor titles through an era of dominance. 2014 to 2018 has been Mercedes through and through, but from 2010 to 2013 it was Red Bull Racing with Sebestian Vettel and Mark Webber in both cars. 1999 to 2008 was a great time for Ferrari’s constructor titles, but in 2005 and 2006 Renault got their two constructor titles thanks to Fernando Alonso and Giancarlo Fisichella. And from 1998 backwards Williams, Ferrari and McLaren went for the title from time to time.
And this is not to say how the rest of the field went during the years as well. If we remember that McLaren were suffering with Fernando Alonso and Stoffle Vandorne at the wheel in 2018, this is now the same team that is going well with Carlos Sainz and Lando Norris with those drivers previously being at Renault F1 and Carlin F2 respectively. With the need for someone to come first and someone to come last in a race, the performance issue affects everything from how closely the top four battle it out, to how well the back markers can keep up with the mid field.
As with the Fixing Monaco article, we need to establish base rules to make this discussion civil and somewhat logical:
1. Safety is our number one concern. We are not turning this into death race by allowing weapons to be attached to the front and rear wings under regulations. This is racing and we want it to be close, competitive and clean.
2. No throwing out the rule book and reforming Formula 1. While it would be a major shake up to say Formula 1 will revise every rule from dimensions, to engines, and the concept of being open wheelers; it would mean that the series isn’t strictly “Formula 1” any more. When I think F1, I imagine open wheeler single seater fighter jets on wheels. Redefining F1 to be a pick up truck racing series for 2021 is again ridiculous.
3. We need to push automotive engineering. F1 is the pinnacle of automotive technology. Engine, suspension, aerodynamic, tyre, brake, safety, and fuel technology is continually push in their ecosystem of Formula 1 and some of those developments trickle into the road cars that us mortals use every day. With that philosophy in mind, we can’t ask them to return to V12 engines since the world demands higher performance engines with improved economy.
So where do we begin?
Plan A: Manufacturers Make Cookie Cutter Cars
If we want close and competitive racing, why not force the constructors to make nearly identical cars? Think of the Formula E Championship, Formula 2 Championship, and the Australian V8 Supercar Touring Car Championship, series which have such strict homologation on dimensions and engine outputs that the racing cars produced are near identical. This is a great racing platform for ensuring drivers have equal resources to compete in the race with, and also means they have an equal chance of winning. Winning becomes a matter of having the best driver, the best pit team, the best engineers to monitor and maintain components reliably, and the best strategists to come up with a winning race plan. If you have watched any of these three series, the racing out the front and into the mid field is pretty intense and lead changes can occur due to minute errors. Additionally for Formula 1, it means privateer teams could change engine suppliers readily since they don’t have to redevelop their chassis to fit a new engine. What if McLaren could have dumped the failing Honda units and gone for Mercedes engines mid year? I know contracts might get in the way, but the physical engineering of an engine change wouldn’t stop it, just paper work and promises. So in terms of making highly competitive racing and closing the performance gap, forcing manufacturers to make identical cars is a brilliant idea.
But it also means the racing can become boring over time. If we know the cars are identical and if we know it all comes down to skill and resource management, after a while it could be assumed that the team with the largest budget would invest in buying the best driver, the best pit team and the best strategists. Some of the back marker teams could get lucky and somehow sneak a win, but in the end would you watch a racing series where the cars are one and the same? I don’t think we would.
Additionally, how would we push innovation? It was up to the FIA to develop rules that allowed the 2nd generation of Formula E cars that could complete a race on a single charge, then the manufacturers had to produce components within narrow margins to meet regulations, and then fit them within a chassis specifically designed by the FIA. We could face the same problem in our figurative world of “copy-paste F1” where teams can no longer push engine performance and efficiency, aerodynamics, and weight redistribution since the FIA would cap power output, aerodynamic elements and chassis dimensions to prevent teams from sneakily getting ahead of each other. The engineering department of teams would be left with the stale task of testing components for wear and tear, and maybe tuning the living hell out of the car for certain tracks. But otherwise making the cars all the same might stagnate Formula 1 after a while. What else could we do?
Plan B: Rev Revolution
This video will be referred to from time to time as it shows the evolution of engine layouts and how the chassis has evolved over time. As we can see, the engines have been everything from inline 4’s to flat 12’s, V10s to V6’s, and now we are in the era of hybrid systems where electric motors and forced induction assist the internal combustion engine. So it is reasonable to ask for a change in engine regulation moving forward, and it will most likely happen before 2025.
What we can and can’t do is becoming a bit more obvious as time goes on:
a. Larger naturally aspirated engines will not return. Formula 1 needs to push innovation not only in power, but in efficiency and reliability. The massive V10s of the late 1990’s era sounded awesome, but there is no incentive for teams to develop a V10 behemoth when road cars and some race cars need to meet carbon emissions and noise pollution regulations.
b. Flat layouts are unlikely to return. There needs to be an incentive for the teams to develop an engine layout, not only for the race car that they are trying to win the F1 championship in but for their premium and consumer road cars. In the mass market, only Porsche, Toyota and Subaru are developing and selling road cars with flat engines in them; so why force Mercedes, Ferrari and Renault to make an engine they are not likely to use in their road cars?
c. Hybrid should be the platform moving forward. Before anyone starts panicking that “Formula 1 will become an electric series”, don’t panic because the FIA created the Formula E series for a reason. With the intention of pushing automotive engineering to the limit, it would be within the FIA’s interests to keep the series running hybrid systems and place importance on the MGU-K and ES units since regenerative systems may be the innovations we need to keep internal combustion engine commuter cars alive. If there were fears of liquid dinosaur running out, then the FIA should turn to biofuels or hydrogen fuel systems to power the next generation of Formula 1 cars.
We will either see the continuation of V6-turbo-hybrids, or the introduction of inline four-turbo-hybrid or V4-turbo-hybrid systems (https://www.porsche.com/uk/aboutporsche/pressreleases/pag/?pool=international-de&id=25E069745942CA3DC1257C7D00456E75). V4-turbo-hybrids are rare at the moment and have only appeared on the Porsche Le Mans prototype, but if we needed to shake up the engine wars and potentially entice Porsche, Toyota, and Audi to join the series as engine manufacturers this could be a viable option. If there is an established status quo, whether in motorsports or even social circles, it is often difficult for a new entity to enter and make an impression. If a company like Nissan came along with their VR38DETT engine from the GT-R, not only would it need to be adapted from twin turbo 4L into a 1.6L single turbo and have the other MGU systems on board, but by the time they had implemented this design it would be significantly behind Mercedes and Ferrari who have already had generations to perfect it. But make the new engine a V4-turbo-hybrid and now anyone could make an entrance in the engine supplying game and power an existing chassis like Williams, or create their own factory team. This is a lot of speculation, but V4-turbo-hybrid technology hasn’t been broken into much and F1 could be the platform for it. Contrast this to I4-turbo-hybrid engines, and a lot of manufacturers could join. Toyota, Ford, Nissan, and the Volkswagen motor group including Audi could jump into the competition. Even if new manufacturers didn’t jump into the fray, having a new engine layout would surely shake up the grid. But remember, this is about making closer racing rather than artificial entertainment.
Since 2018, news outlets have reported on the 2021 rules and regulation changes that may and will be imposed by the FIA for Formula 1 (https://www.formula1.com/en/latest/article.formula-1-in-2021-where-we-stand-and-what-happens-next.3f4zgyDjeERMFtxaymbncK.html) and it is interesting that the hybrid and battery systems will be standardised to a point. The implication is that every driver should have a certain energy they can use to boost their cars in certain situations, but no team can have an overwhelming advantage such as Renault using superconductive wire to reduce power loss. I like this core idea since the teams will now have to reconsider how their ICE can deploy the power from the hybrid system, rather than making the battery bigger and beefier. Another set of regulations would see teams unable to modify their engines too far beyond the manufacturer’s provided engine. In other words, customer and privateer teams like Racing Point and Williams will have nearly the same engine as Mercedes. If Mercedes want to be better than Ferrari, they need to improve the standard engine which means Racing Point can fight harder against Haas and Alfa Romeo Sauber. Now the entire field should be on more equal footing in terms of power, engine innovations are more widely shared, and the performance gap should be reduced a bit more.
Until the 2021 rules and regulations take effect with streamlining engine development and standardising energy storage systems, there is nothing in the next two years that can really influence closing the performance gap within the scope of the power unit. Moving forward past 2021, having these regulations is a good step in the right direction. But performance is not just down to how much power the car can output.
Plan C: Aero Dynamics
How aerodynamics have progressed over the past 69 years has been incredible. One of the major aerodynamic overhauls and subsequent regulation changes was when Mercedes decided to cover the wheels on their F1 cars for circuits with long, high speed straights in order to improve air flow and lap times times. After that, the governing body banned wheels from being covered and that’s a contributing factor to why Formula 1 will remain an open wheel racing series. We’ve had bullet shapes, shark fin radiators, massive wings almost 2 metres in the air, the weird “X-wing” era, and now the fighter jet-like open wheeled racers of the modern circuit. So why has aerodynamics evolved and what can be done?
Aerodynamics is simply the study of how air interacts with static objects. Initially the aerodynamic war in Formula 1 was concerned with making the fastest car in a straight line, and that’s why they resembled bullets with wings and had the largest engines possible for the time. But as Formula 1 continued and certain factors within the sport influenced track design and performance barriers were encountered, teams realised that aerodynamics can help make a car faster in the corners and on the straights. While everyone receives the same tyres from Pirelli (well, previously teams could select different tyre manufacturers and boy was that fun), generating grip is an exercise in aerodynamics and how far you can push the limits given by the FIA.
The FIA provide certain limitations for wing design, barge boards, side pods, halo design, and winglets in order to provide a fairly level playing field for teams to create their chassis and aerodynamic package, but they can experiment and reiterate design in order to maximise certain aspects of their car’s interact with the air during a race. Crucially, there is no maximum for how many wings can be redesigned or replaced during a season, it is up to the team’s funding to allow this. While a dirver is only allowed 3 engines per season without penalty, and the Parc Ferme stops teams from majorly altering suspension and chassis set ups between qualifying and the race, aerodynamics has no true regulations after that. In truth, you could bring a new wing design to every race and as long as it fit within the FIA’s stringent guidelines, you’re not penalised for bringing a new wing. As long as you have the budget and the aerodynamic team behind you to keep innovating a pushing the boundaries on what is possible within the FIA regulations, a car’s aerodynamic’s package can keep evolving. There are a few areas that are a “no-go” such as the underbelly of the car which can not be modified, “blown axles and rims” were exclusively banned after Mercedes tried to test the limits in 2018, and truly insane things like the Brabham BT46 or “fan car”. Otherwise, the regulation of aerodynamics has always been a reactive process.
Consider the Brabham BT46 for a moment. Before it was introduced, there was nothing within the regulations to prevent a team from making a car like this and entering the competition? Provided that it met the existing rules and regulations, no one could stop the fan car from racing because there wasn’t a rule to ban it. And so when the fan car demolished the competition in the 2 races it participated in, the FIA went about forming rules and regulations in order to ban it. We are in an era where the rules appear to be solid and unmoving, yet teams are still finding neat ways to innovate aerodynamics within the existing rules and regulations. So what can we do?
Honestly I was of the opinion that aerodynamics would remain a reactive set or rules and regulations but my friend Farm-Rad posed a unique solution to say the least. Why not alter the tyre specifications to push the limits of aerodynamics? Insane, but he has a point.
“In Formula 1 there are two types of grip, mechanical grip and ground effects. At the moment the tyres are wide, thick, and teams like Haas have complained it is difficult to warm them up and keep them at operating temperature. Pirelli want to market their tyres as the best in the world, yet a Formula 1 tyre’s performance isn’t going to make me buy some for my *sport crossover soccer mum car* because they are two very different tyres. Why not add to the reduced tyre thickness that’s coming in 2021 but also make the tyres narrower like in the early 2000s and previous? Teams can’t do anything to improve mechanical grip other than tweaking suspension so the contact patch is optimised, but what if the tyres were no longer so thick and wide but rather forced teams to improve their aerodynamic packages to compensate for less mechanical grip? Bring back ground effects and insane aero tinkering, because Pirelli don’t seem to be doing a great job of innovating tyre design.”
He did raise some great points in the phone call and it made me reconsider what the aerodynamic regulations should be moving forward. Why do we increasingly make aerodynamics harder to innovate within when getting rid of the monstrously thick F1 tyres might be an alright solution? This is potentially a slim solution if any to the aerodynamic woes of modern Formula 1, but other than force teams to use the same aero packages and chassis as each other to make close racing, why not throw a spanner in the works and force them to innovate in order to regain grip lost? Aero is otherwise a difficult area to limit within the sport and while the new DRS standards and wing design did do a bit to improve the ability to overtake, it still hasn’t stopped Mercedes from running away with victories and left Williams at the end of the pack. And while the 2021 and future vision of Formula 1 paint it as ultra-sleek, carved by the wind car designs, just remember that this appeared in 1997:
And this popped up in 2008:
All I’m saying is the future doesn’t turn out the way you expect it in Formula 1…
Plan D: We Are Moving to Plan D…
Vettel’s favourite words last year and might be heard a few more times in the 2019 season, my Plan D uses rules that will be imposed in the 2021 season and it involves the teams and funding. Let’s set some rules about team sizes!
At the moment, the grid size is locked down as 10 teams running two cars each. This prevents new teams from popping in too regularly without a race license or drivers without up to date FIA super licenses, and if a team drops out such as what nearly happened to Force India that Ferrari can’t introduce a third car to act as the ultimate wing man. So how can we be in the situation that Mercedes can employ hundreds to nearly thousands of engineers in multiple departments to work on two cars with millions of dollars, yet Williams have a few hundred or less dedicated workers with less funding yet are expected to keep two cars running at the same pace as Mercedes? We can’t reduce the performance of a driver themselves, but what if the logistics of a team were regulated?
Cost capping is the first idea proposed in the Formula 1 media circus and it may do a lot to stem the upward surge of Ferrari, Mercedes and Red Bull. But then we are potentially capping the development of automotive engineering for the sake of letting Williams and Torro Rosso catch up to their big brothers. And if we cap the costs of teams like Mercedes who attract large sponsors, then what happens when the racing team no longer produces the results they did before cost capping?
A solution might be to cap the staff needed and entice certain people within the Formula 1 world to sign contracts on where the big money is? Reflecting what currently happens on the grid, remember that with only 20 seats in 10 teams drivers are in high demand to perform exceptionally and keep driving to maintain their seat. But what if we limit the amount of power train engineers, aerodynamicists, and suspension tuning servicemen per team and let the team’s funds dictate who goes where? If I have a team of five engineers and a budget of $50 million, then those engineers better be worth the $10 million each and help push our team’s cars to the front of the grid. If there was a more promising engineer in another team or in another motorsport, then we could hire them. If drivers can lose seats and teams can pick up drivers from F2, why not introduce the same intrinsic pressure on the engineering teams?
This would in theory level the playing field a bit better than the salary capping idea since Mercedes would really need the best of the best engineers to maintain their position on the grid while Williams and Haas could have a chance by taking in the same amount of staff members and have them work diligently knowing they are no longer outnumbers 100 to 1?
Plan E: Natural Evolution?
I know it is easy for fans to criticise the FIA and say they are making too many rules to make the sport “sterile” or “fabricated entertainment” but in reality we are dealing with a sport where cars can gain or loss seconds per race by having too thick of a paint job that catches the wind too much. There is no way to control the weather, drivers get tired and might not perform at their best, and the teams that travel miss their families and sacrifice time to be with their family and friends to make sure a petrol fuelled car goes around a loop of road faster than other teams in the same position. So why make the rules easier or harder by our standards when the sport will continue to go on and in all fairness F1 will sort itself out?
As I mentioned at the beginning of this article, nearly every manufacturer except Torro Rosso, Haas and Racing Point have won a constructor’s championship. Brilliant drivers have come and gone, switched teams, and shaken up the grid in their own way. Raikkonen was once a world champion. Last year Raikkonen was in a Ferrari beating Gasly in a Torro Rosso but now Gasly in a Red Bull is breezing past Raikkonen in a Sauber. Riccardo had 4 DNFs as of the Austrian Grand Prix, yet Red Bull have had no retirements as of Austria this year. My point is the sport moves along, slowly but surely, and maybe that’s all we need? Why must we find ways to pacify Mercedes and Ferrari when Williams could stumble onto a development that catapults them into mid-field, but the rules that pacify Mercedes stop this from happening. The problem is that if we believe that imposing a certain rule will prevent a certain team from earning a certain result, then we are fixing the sport as much as adding sprinklers to a track to make it rain when we want. Unfortunately, by trying to reduce the performance gap by introducing all these new rules we will further exacerbate the performance gap after the dust settles on a major rule change?
What of the Future?
From this image, we can already see that the ideals of 2021 are not going to go the way they desire. That appears to be Vettel and Hamilton going head to head at Indianapolos. Jokes aside, while there are elements such as the tyres and simplified wing design that have been mentioned in press relating to the 2021 overhaul, what we recieve in 2021 will be vastly different in execution to the concept art shown. There will still be the jagged aero kits, wing mirrors may soon be a thing of the past, and I don’t think cars will be getting that narrow any time soon. For the time being, our best hope will most likely be the standardisation of battery systems and engine mounting platforms so we can maybe attract new engine manufacturers to the mix? A more balanced distribution of monetary winnings post-season might help a bit, but capping expenditure completely might be too drastic of a step? And after the Austrian Grand Prix, there is hope that other teams and engine manufacturers can make a break for the front row and winning streaks can be broken when a team pulls together. We have had some “dull” races this season, but you never know what might happen next week, next year or even in 2021?